Saga of the Saiga
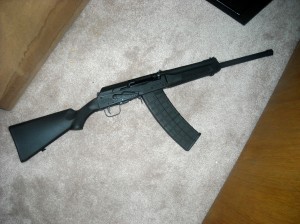
 Well I finally managed to scrounge up all the parts and all the tools I would need to convert my Saiga 12 back to its intended design. To make the gun 922R compliant for importation it was brought over in a “sporterized” form with no pistol grip and a cheap hunting style stock. To make the trigger workable with a rifle style stock and no pistol grip the trigger had to be relocated about an inch and a half back basically to where the pistol grip should be.
To start off I gathered up the tools I would need for this conversion:
-small vice
-drill
-Dremel
-small and large flathead screwdrivers
-small needle nose pliers
-hammer
-various size punches
The parts I used were:
-KVAR Nato length stock
-Tromix DIY Trigger guard
-Tapco G2 trigger group modified by Tromix
Friday night both my wife and daughter weren’t feeling very well so they both went to bed early so I headed to the garage to play gunsmith. I started by verifying that the gun was unloaded and visually and physically checked to make sure the chamber was clear.
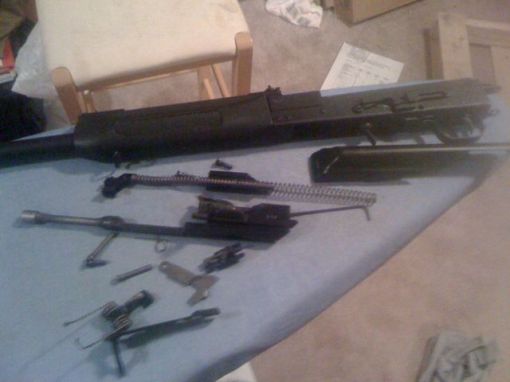
Next I field stripped the gun by removing the top cover, taking out the recoil spring, and then removing the bolt and bolt carrier. With the gun field stripped I could access all three of the screws holding the stock on. Using a large flathead screwdriver I removed the three screws holding the stock on and then proceeded to beat on the stock until it worked its way free of the rear of the receiver.
Now the real fun, taking out the guts. I used a small flathead screwdriver to push down on the axis pin retaining spring which allowed me to drift out the axis pins which hold in the hammer and the linkage between the trigger and the hammer. Once both pins were out the linkage and the hammer along with the hammer spring could be lifted out of the receiver. Once those were out I lifted the original bolt hold open also.
The next thing that needed to be removed was the trigger assembly that was held in by two rivets. I initially tried to drill the head off of the rivets but ended up finding it easier to just use the Dremel to grind the head of them off. Once I had the head off I used a punch and a hammer to knock the rest of the rivets out allowing the trigger assembly to be taken out as well.
Once all of the insides were on the outside it was time to turn my attention to the original trigger guard. If the trigger had to be moved forward then the trigger guard would need to follow. The trigger guard was held on by three more rivets. Since I found that the using the Dremel to grind the head of the rivets off worked better I just started with that technique this time and it served me fairly well. Once I had all three rivet heads ground off I once again grabbed the punch and hammer and started knocking out what remained of the rivets. Two came out with little trouble but one did not want to come out. I grinded on it some more to no avail, I eventually had to drill it out and I think I actually made the hole a little bigger in the process but the river finally came out.
With the old trigger guard removed I prepared to install the new trigger guard from Tromix. I purchased the Tromix Do-It-Yourself Trigger guard because it just seemed a lot simpler than trying to modify the receiver even more than I already was. The Tromix trigger guard allows you to mount a pistol grip to the actual trigger guard instead of having to cut a pistol grip hole in your receiver. It also has a nice angular look to it which adds some CDI points. The trigger guard bolted in through the existing rivet holes and the hole that was for the old trigger. This is only designed to work with the Tapco SAW grip so I had limited options for what pistol grip to use but I hear that more options might be on the way. I was slightly worried about the stability and ruggedness of mounting the pistol grip to the trigger guard like this but now that I have it installed and have had a chance to shoot it I have no doubts that it will hold up just fine.
With the pistol grip and ne trigger guard attached it was time to turn my attention back to the inside of the receiver. I was going to use a Tapco G2 trigger assembly that had been modified by Tromix for use in the Saiga 12. This involves removing some material from the side of the hammer to clear the original bolt hold open (if you keep it) and grinding part of the hammer to make it clear the bolt so the gun will cycle. I dropped the trigger assembly in and then set the original bolt hold open into place so that the axis pin that holds the trigger in place would also hold the bolt hold open spring in place. Not everyone reinstalls the bolt hold open but I am a fan of locking my bolt back when at the range and not shooting that particular gun to help show it is clear, also it is much easier to load a full magazine into the gun when the bolt is to the rear.
Once the rear axis pin had been installed and was holding the trigger assembly and the bolt hold open spring I moved on to the hammer and hammer spring. Things can get really tricky with the spring so I took some good advice and put tension on the spring and wrapped it in tape to hold it in place while I installed it into the receiver. After the hammer was in place I reinstalled the front axis pin which holds the hammer and bolt hold open in place. Once I was sure it was setup correctly I cut the tape around the hammer spring allowing the two legs of the spring to snap into place. Finally to ensure that the axis pins will remain in place I installed a shepards crook spring which is designed to hold both axis pins in.
The shepards crook spring was fairly easy to install. I started by inserting it into the receiver from the rear and then making the long part of the spring go over the first axis pin and then under the second axis pin. Using a small flathead screwdriver to move the spring around and push it over this or under that made the process much easier. Once I had it lined up correctly I just used a punch to push it the rest of the way until it snapped into position.
At this point the new fire control group was completely installed. All I did was a quick couple of function checks to make sure the trigger would release the hammer and that the hammer would reset. Once I was sure that everything was working they way it was supposed to I put the bolt, recoil spring, and top cover back on.
The last part I needed to install was the KVAR Nato length stock I had picked up. This is a much more traditional AK style stock than the sporter stock that the Saiga came with. It was a direct bolt in replacement, the only modification I had to do was drill the actual holes for the screws into the stock itself, it utilizes the old holes in the receiver. The stock fit pretty snug into the receiver and with the screws added it is rock solid.
 Finally it was done, I had converted my Saiga back to the way it should be. I was slightly concerned because when you switch the old hammer to the new hammer that is in the Tapco G2 fire control group it rides slightly higher which makes it drag against the bolt a little more making the gun not cycle quit as well. It definitely wasn’t as smooth as before but I wasn’t sure if it would affect the actual cycling of the gun when being fired. To help smooth things out, or maybe just make myself feel better, I oiled up the fire control group and the bolt and then worked the bolt back and forth a few dozen times to help the parts wear in.
The next day I swung by my local ammo supply point (Sportsman’s Warehouse) and picked up some slugs, some buckshot, and some full power birdshot loads. I also took along some of the real cheap Federal bulk pack 7 1/2 shot from Wal-Mart. I started with the slugs to help break the gun back in and it ran great, no issues at all. After that I switched to the buckshot and then the full power bird loads and it still ran with no issues. Once I switched to the Federal bulk pack I had a few stovepipe malfunctions until I adjusted the gas system to the higher setting which is normally needed for bird shot. Once the gas system was properly adjusted I had no further issues with the bulk pack cycling.
Overall I am exceptionally pleased with my conversion. I am extra excited that it is cycling the bulk pack bird loads that I can get 100 of for a little over 20 bucks, makes going to the range more enjoyable when I can actually afford to shoot as much as I want. I was fairly nervous going into it but I had a blast doing the work and now have a much better understanding of how my gun works and how AK’s work in general. I got a little carried away with the work and my cigar and forgot to take step by step pictures like I meant to. If someone is considering doing a conversion likes this and would like some specific pictures or a better explanation of how I did something just reply down below and I’ll see what I can do.
Keep up the good fight
-Rob
